Moss stitch: Sc in first stitch, *ch 1, skip 1 stitch, sc in next stitch. Repeat from * across, ending with a sc.
Notes:
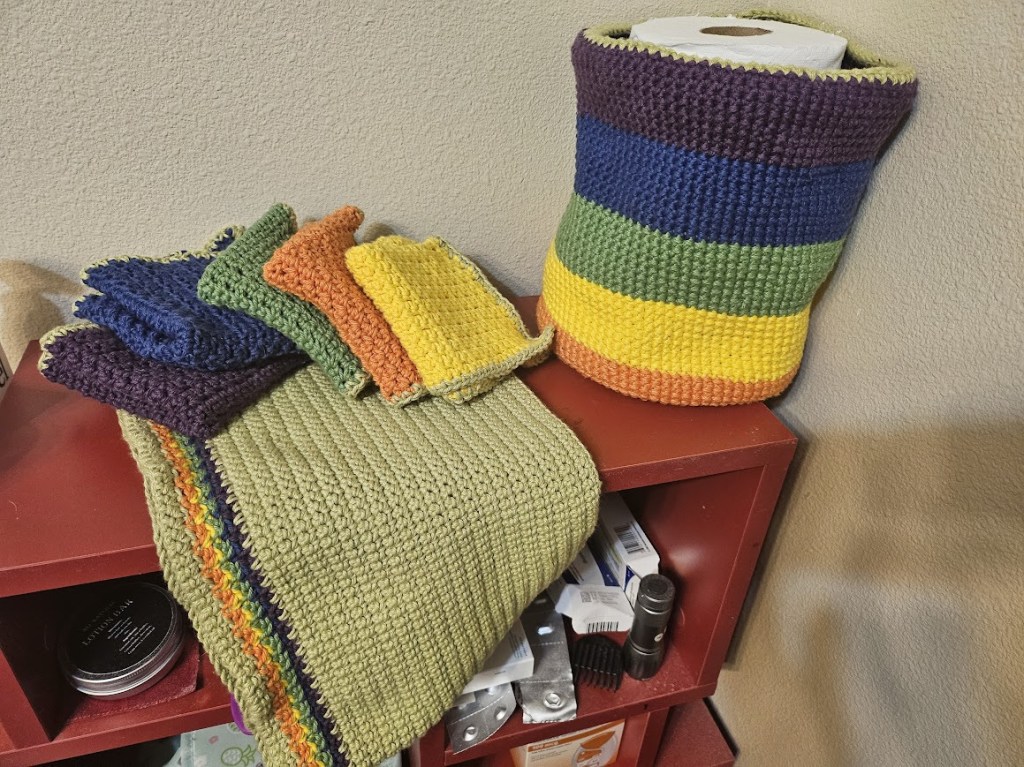
Depending on how closely each skein is to its promised yardage, you may end up with a bit less yarn than you need to finish a final row. Frog back to start of previous round and pick up next color, or you can simply add the new color where the short color ends if you like how it looks.
Order of operations to guarantee you have enough yarn for all parts is as follows: Complete first 7 rows of towel, then complete washclothes, then complete the basket, then finish towel. The instructions are written with this in mind.
Towel Start:
With 5.00 mm hook and Color F, Chain 126.
SC 125 across. Ch 1. Turn.
SC across. Attach Color A in final stitch. Ch 1. Turn.
In color A, complete a row of moss stitch. In the final stitch, attach Color B. Ch 1. Turn.
Repeat previous row with Color B. In the final stitch, attach Color C. Ch 1. Turn.
Repeat previous row with Color C. In the final stitch, attach Color D. Ch 1. Turn.
Repeat previous row with Color D. In final stitch, attach Color E. Ch 1. Turn.
Repeat previous row with Color E. Leave a loop open and set aside.
Washcloths:
Make 5, with main color A, B, C, D, and E and trim with Color F.
With the 5.00 mm hook, Chain 40.
SC across chains (39 sc). Ch 1. Turn.
Complete a row of moss stitch. Ch 1. Turn.
Repeat last 2 rows until you have 39 rows (you end on a single crochet row). Fasten off.
Join Color F to any edge stitch of the washcloth. SC evenly around all 4 sides, working 3 sc into each corner stitch.
Basket:
You will work all rows with yarn held double.
With the 2.5 mm hook and Color A, work 2 sc into every pre-punched hole in the basket bottom. Join with a ss to first stitch. Ch 1, continue working in spiral rounds throughout. Switch to 3.75 mm hook for all other basket rows.
Work 7 more rows with Color A in sc, joining with a ss at the end of each row and ch 1 with no turn. Before join at the end of row 8, join Color B.
Work 8 rows of Color B, changing to color C in final stitch before joining.
Repeat last 8 rows with Color C, then Color D, then Color E.
With Color F folded double, work 1 row around. Join with the ss and fasten off.
Towel finish:
Picking up from open loop of Color E, attach Color F and work 40 rows of sc. Fasten off. Weave in all ends.
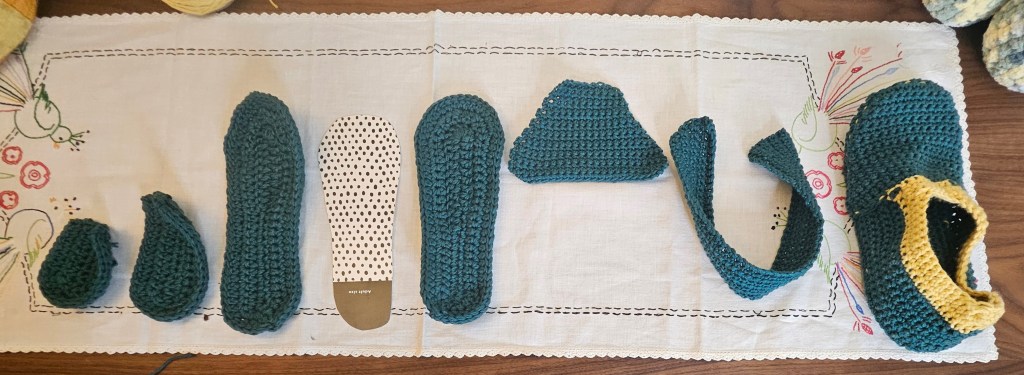
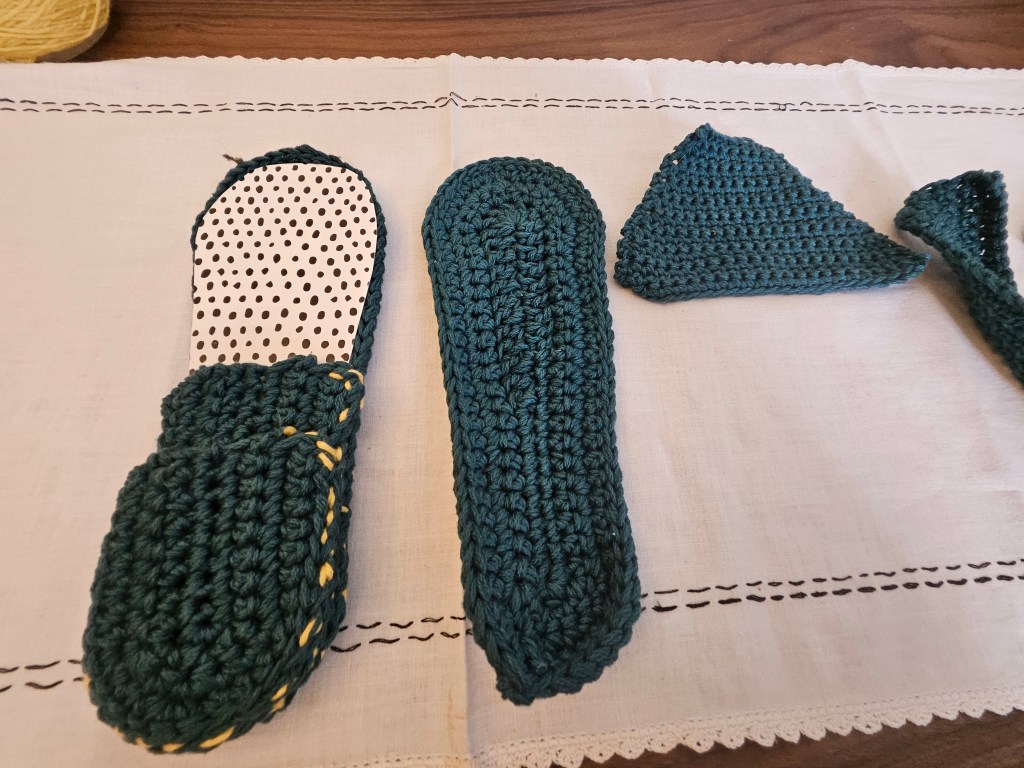
And it looks very simple, but it has a lot of parts you have to sew together. So, here’s a quick photo reference of how it all goes together using the names of the pieces from the pattern:
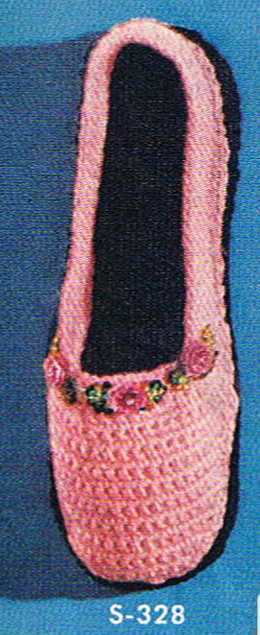
(Note: The trim on the finished slipper is not in the pattern; I just did that for a better fit.)
From left to right: Top Heel Piece, Bottom Heel Piece, Bottom Sole, Cardboard Insole, Top Sole, Upper – Instep, Back Piece, Finished Slipper
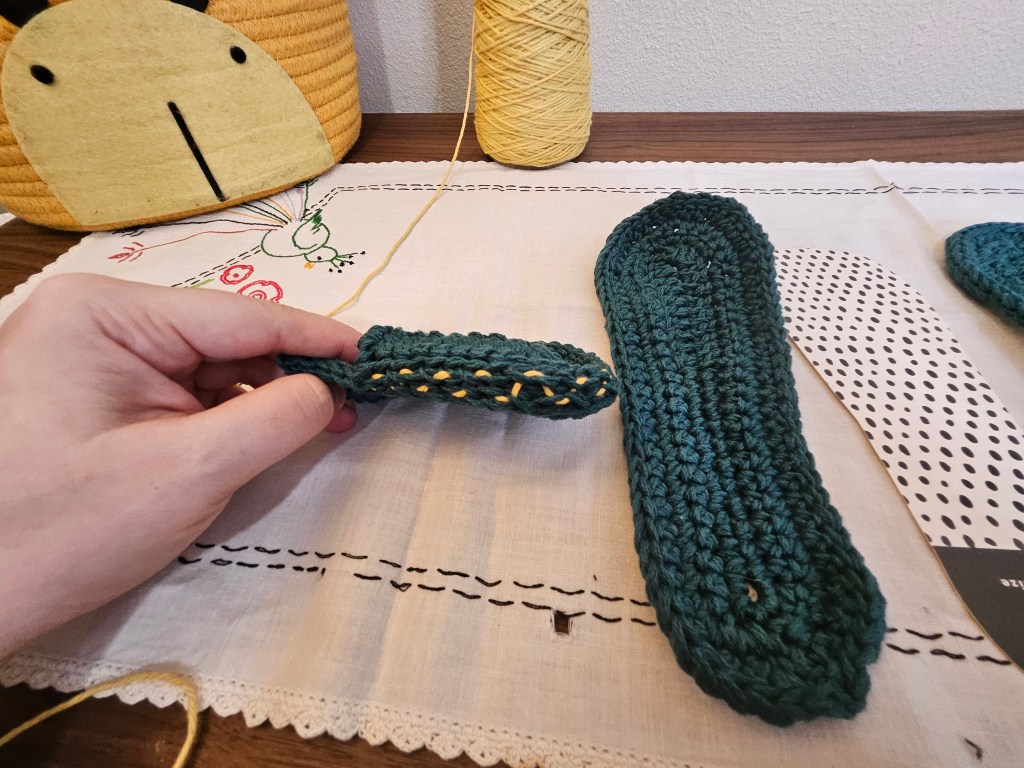
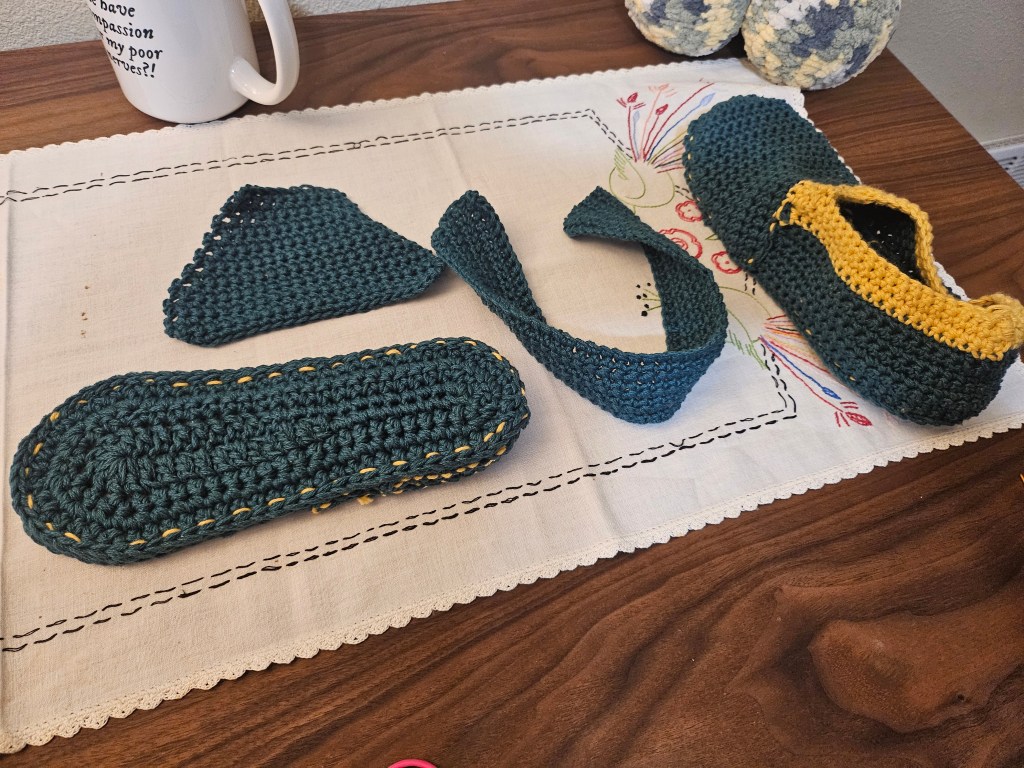
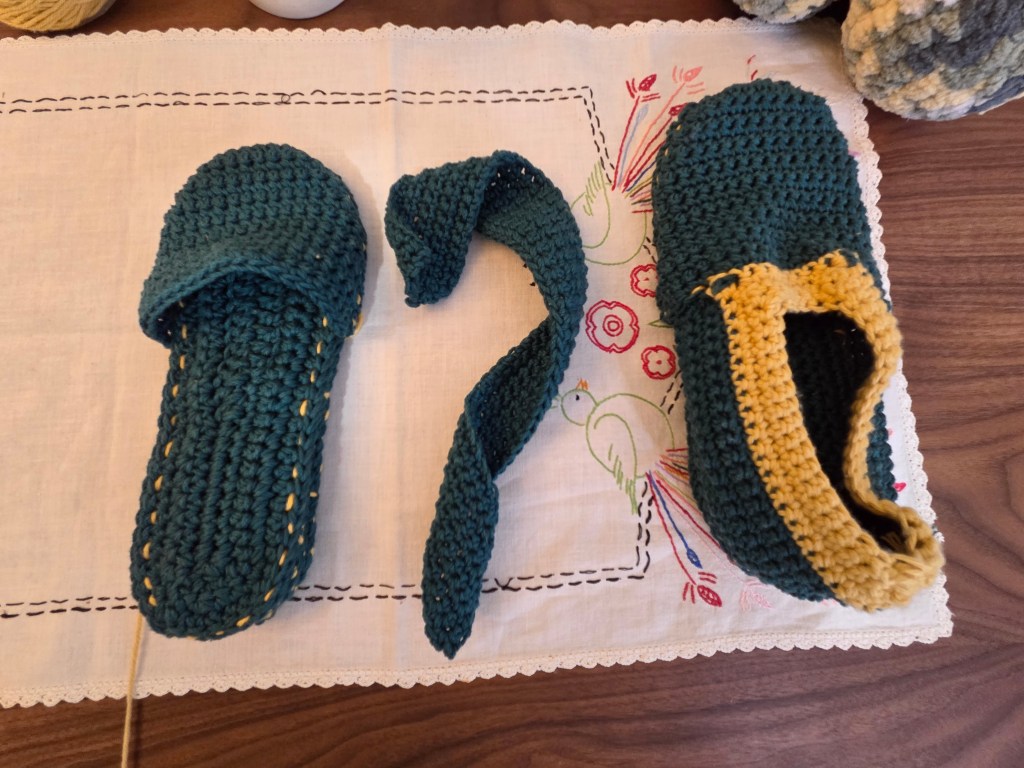
Top Heel Piece and Bottom Heel Piece sewn together.
Top and Bottom Heel Piece Sewn to Bottom Sole with Cardboard Insole in place.
Top Sole sewn to Bottom Sole and Top and Bottom Heel Pieces.
Upper – Instep sewn to the Soles.
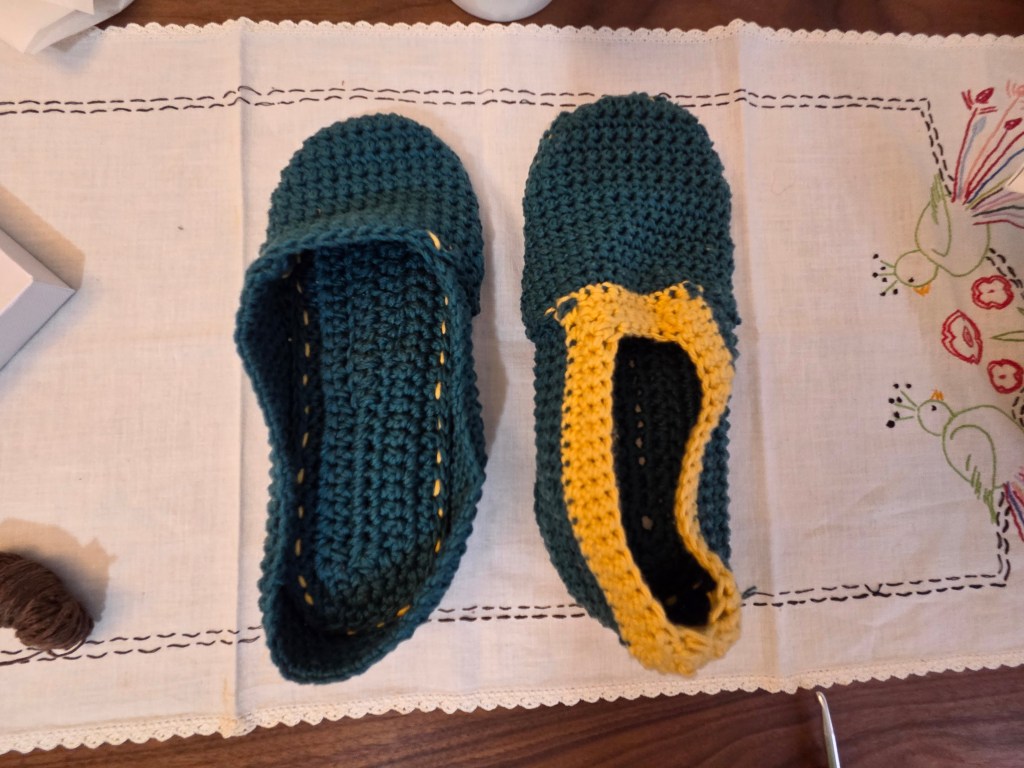
Back Piece sewn to Upper – Instep and Soles.
As mentioned above, the trim was something I did on my own to make the slipper fit a bit better. If you need it as well, go down a full millimeter in hook size and work four rows of single crochet, working decreases at the upper corners. Try on as you go to get the fit you want.
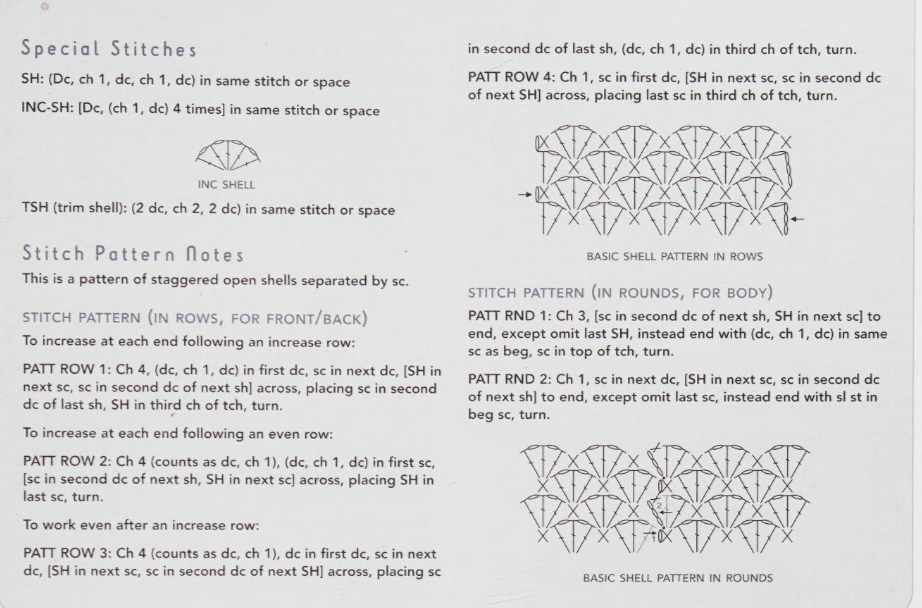
It confused me because the actual pattern row explanations were in another spot, and there were two sets of instructions:
There was the Stitch Pattern (In Rows, For Front/Back) and the Stitch Pattern (In Rounds, For Body). Now, I knew I was working the front and back, so I realized I was supposed to work those pattern rows, but then I got a little more confused by the comment above the Pattern Row 2: “To increase at each end following an even row.” I was confused because there was nothing in the written out instructions about increases, and so I was worried that I was missing some important note about how to increase.
That was not the case. Turns out, it just meant “You increase on this row when you work it.” And as long as you work it according to what Doris says, it comes out great.
I am a creature of habit, and while I expect vintage patterns to confuse me at times, I generally don’t have problems with modern ones, especially not when they come from someone as top-notch as Doris Fucking Chan. But sometimes when the information isn’t laid out the way you expect, it makes you question if you really understand what the instructions are saying.
Hopefully, this helps anyone else who might get a little befuddled like I was. And make starting the project just a little easier.
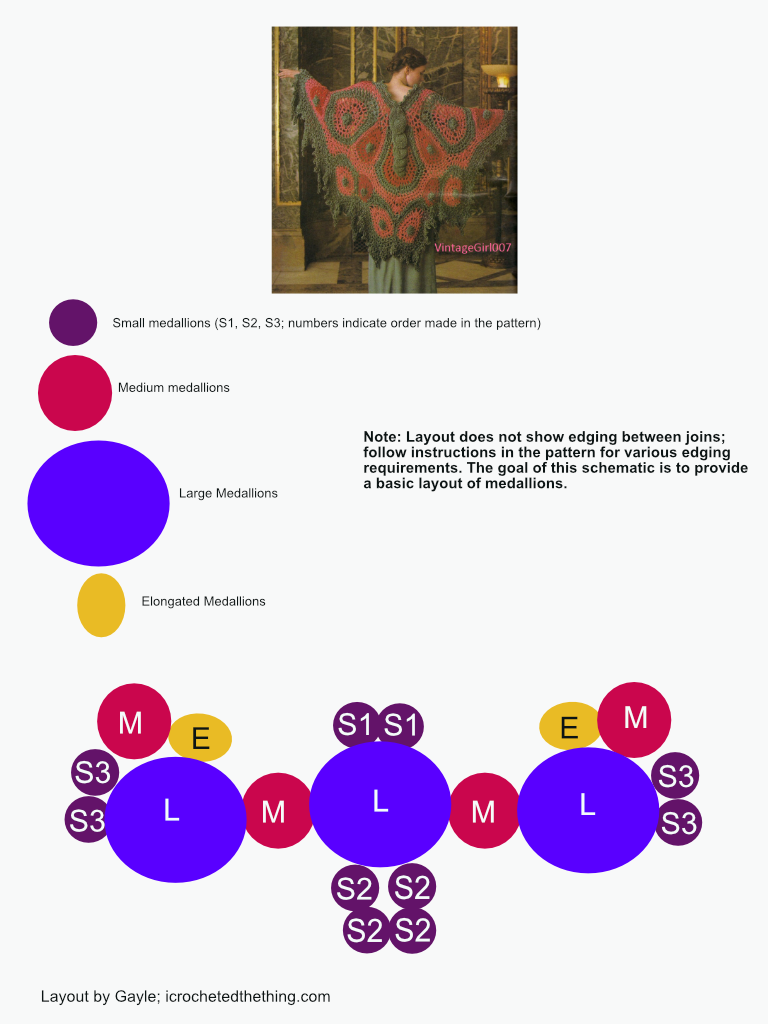
The instructions for this shawl are not great. Not only is there errata (on the vintage errata page), but there is also no diagram to help you figure out what the pattern means when it says attach things to the front or back. So, I made a very, very simple diagram to help in the joining process. May you have less headaches than I did.
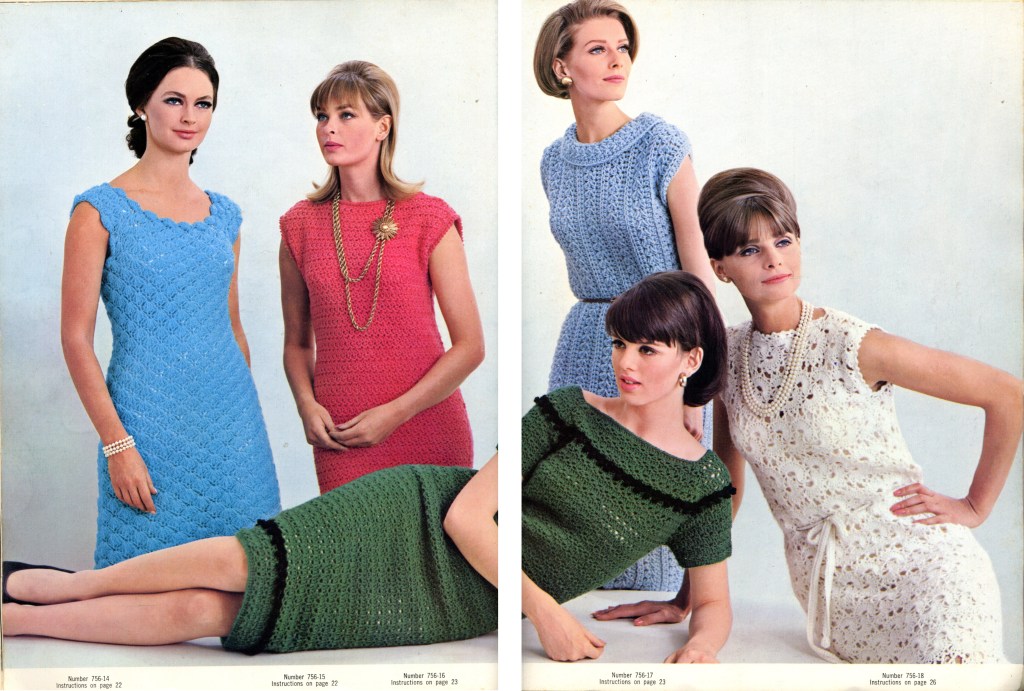
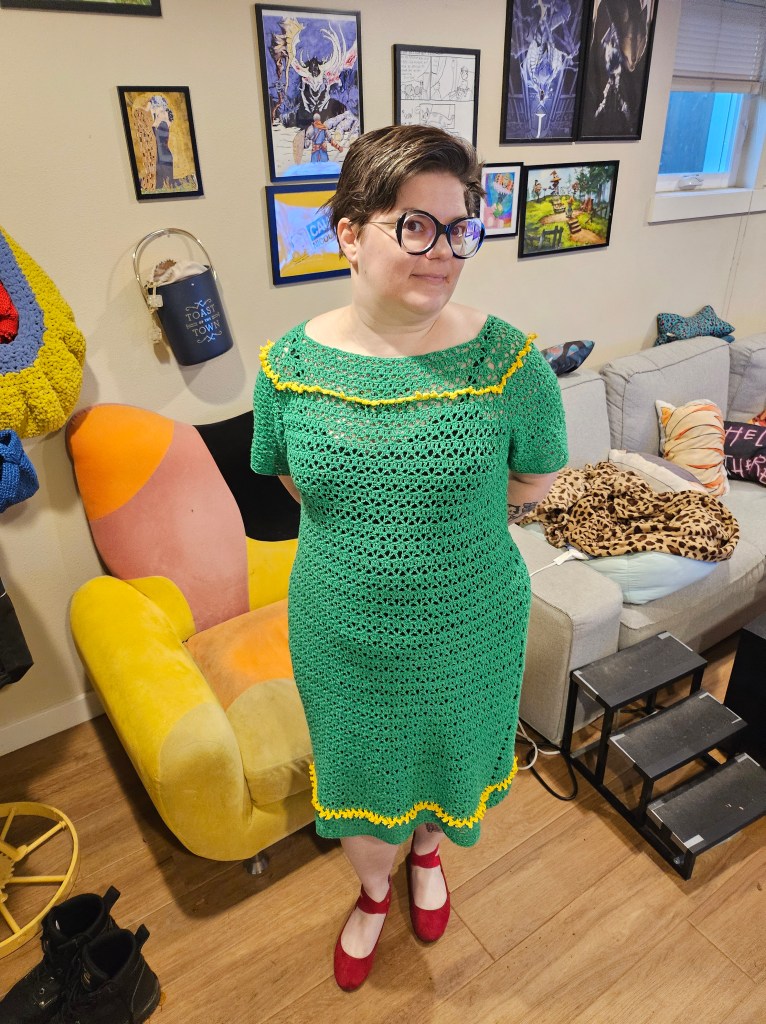
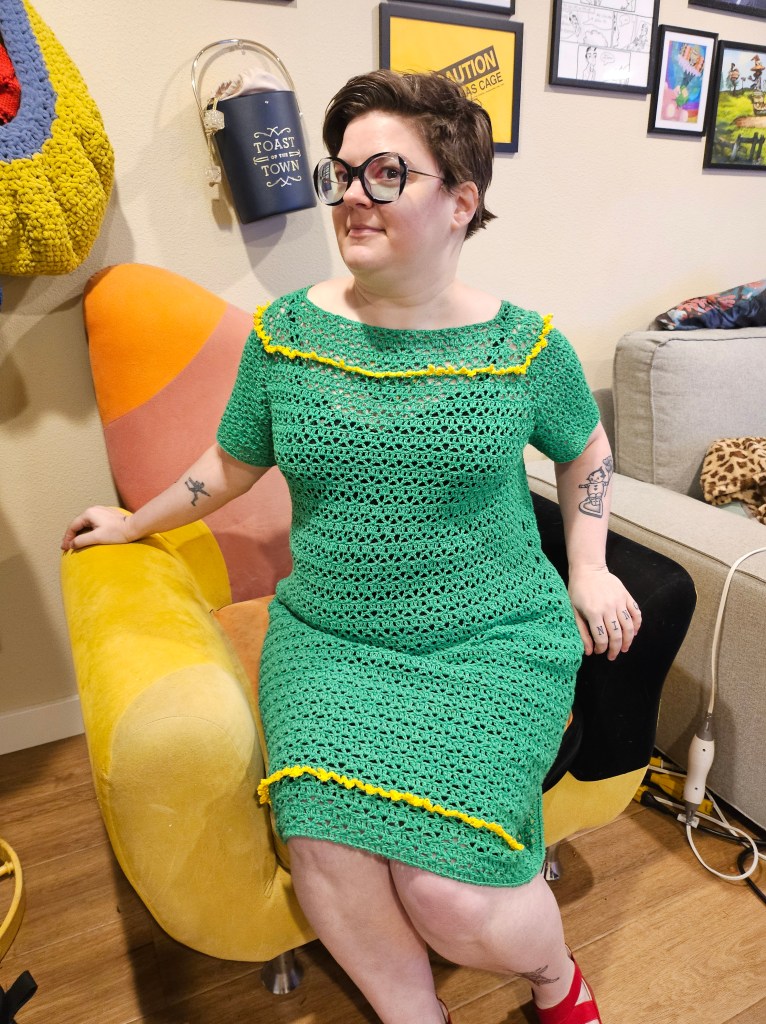
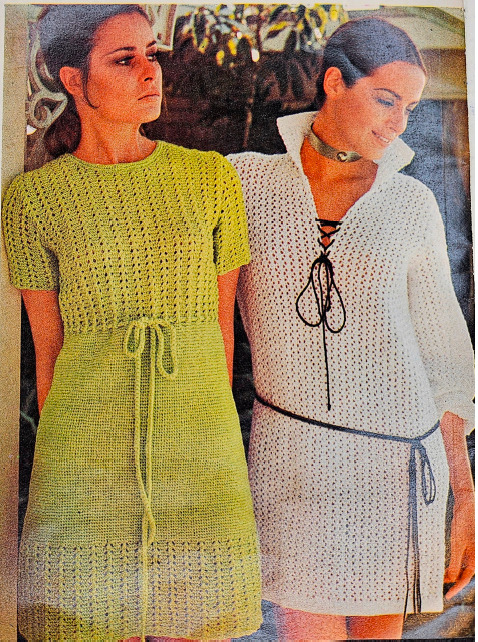
The green dress in the 18-20 size (the size I made), is designed to be 41″ around when sewn together. Size 18-20 in the 1960s meant any bust between 38-40 inches and hips between 40-42 inches. So, the top part of the dress fits me fine as designed. But the part around my hips needed to be increased by several inches to both get around my hips and also have the same ease as the rest of the garment. Using the provided gauge (9 DC = 2 inches), I created this increase and decrease so that I could create the needed hip space and then bring the dress back to the original measurements where they were needed.
I completed all of my increases on the back piece, which worked just fine but did cause the side seam to curve some. If you want your seams straight, split the increases equally between the front and the back and make sure to do them on the same rows.
To increase where needed on the green dress, do as follows:
On a double crochet row (Row 3 repeat): DC in joined DC. DC 4 times in ch 2 space. Each increase will add approximately 1/2″ to the garment width. Space increases evenly.
On the next row, complete all joined DCs as usual. You will have an extra DC for each 2 stitches you added.
To decrease, do as follows: When completing a joined DC, skip 4 DC (instead of 2) for each increase you completed earlier. You do not have to put decreases on top of increases.
It is best to complete an increase or a decrease, then work two rows even for smooth shaping.
For the trim:
Join yarn in any DC on the same row indicated for the ball trim. SC around the DC post. ch 2. Complete a picot (ch 3, ss back into first chain of the 3). Ch 2. Skip next DC, SC around following DC. Repeat around.
Did you know Louis Vuitton put out a sweater in Winter 2025 for $3050* and used a wool/poly blend and fake pearls? And then slapped their logo on the tit like it was worth that price tag? Well, I did. And it pissed me off. So, this sweater (overall design in no way copyright protected) is a direct fuck you to that bullshit. May this tutorial be fun for you. It was fun for me!
*If that link ever breaks, let me know, and I’ll drop in a photo.
Supplies
Worsted Weight Yarn (Knitpicks Dishie used in example; sweater took 3-½ cones in Black and 1-½ skeins in Swan)
3.0 mm hook
6.0 mm hook
Zipper (16 inch zipper was used but required shortening)
Sewing needle and sewing thread
Optional Supplies (only if you want to exactly dupe the Louis Vuitton sweater this one is based on)
6 pearls, ½ inch
5 pearls, ¼ inch
Small gold accent
Small amount of gold floral wire or similar item to string pearls and accent
Sparkly brooch (searching “art deco brooch” on etsy is a good place to start)
Gauge
3.0 mm hook: 5 rows = 1″; approximately 4.25 stitches = 1″
6.0 mm hook: 4.25 rows = 1″; approximately 3.5 stitches = 1″
You want the torso of the sweater (worked on the 6.0 mm hook) to be approximately 5 inches wider than the waistband (worked on the 3.0 mm hook) when complete. So, the the front and back torso should each be approximately 2.5” wider than the waistband.
Finished Measurements
Shoulder to hem: 25 inches
Front measurements:
Waistband; 4 inches tall (example sweater waistband is 20 inches wide for front and back (40 inches total))
Top of waistband to bottom of zipper placket: 13 inches
Bottom of zipper placket to shoulder: 8 inches
Width of neck opening at widest point: 7 inches (if you need more space for your neck, you will need to adjust using given measurements as a starting point.)
Back measurements:
Top of waistband to start of neck opening: 19 inches
Back neck shaping: 2 inches tall
Neck opening: 7 inches
Sleeves:
Length:varied depending on length of arm. Work to the base of the wrist, then start the wristband.
Width: approximately 16 inches around at start.
Wristband:
Length: 3 inches
Width: Approximately 6-¼”; you can adjust this by working more or fewer decreases on the sleeve length.
Faux cuffs: 6 inches tall, 2 inches wide
To Start Raised Double Crochet (RDC) Pattern
Chain an even number of stitches. SC in second chain from hook and all chains across. Ch 1. Turn.
Single crochet across. Ch 1. Turn.
Single crochet in first stitch. Double crochet around the post of the single crochet 2 rows below. Skip the stitch behind the RDC. SC in next stitch. Double crochet around he post of the single crochet 2 rows below. Repeat across. Ch 1. Turn.
SC across. Ch 1. Turn.
Single crochet in first stitch. Double crochet around the post of the RDC below. Skip stitch behind RDC. SC in next stitch* Repeat across, ending with a SC.
Repeat last two rows for pattern (see stitch chart below).
For raised triple crochet (RTC), complete as for RDC, but complete triple crochets instead of double crochets.
Increasing and Decreasing
When increasing or decreasing, if the first or final stitch is an RDC, work a double crochet around the post of that RDC as you would any other RDC.
Schematics
Back
With the 3.0 mm hook, chain an even number of stitches that is half the length needed for the total waistband.
Start the RDC pattern rows, then continue in pattern rows (a row of SC, a row of SC and RDC) until waistband is 4 inches tall, ending on a row with RDCs.
Switch to the 6.0 mm hook.
Work 1 row of back loop only (BLO) SC.
Work in pattern rows until the sweater measured from the top of the waistband is 13 inches. Place stitch markers in both ends of the row. Continue in pattern for another 6 inches, ending on a row with RDCs. Do not fasten off.
Back Neck Shaping (6.0 mm hook)
Measure across the top row and place stitch markers on either side of the middle 7 inches of the neck.
Work in pattern to stitch marker. Complete 2 inches in pattern ending on a row with RDCs, then fasten off.
Join at second stitch marker, and work in pattern for 2 inches, ending on a row with RDCs, then fasten off.
Front
Work as Back through the first 13 inches of torso (first part of step #5).
Measure across the top row and place stitch markers at the beginning and end of the middle 4 inches of the torso.
Front Right Neck (6.0 mm hook)
SC to first stitch marker. Ch 1, turn.
Skip first stitch, complete SC and RDCs across, lining up RDCs with RDCs of previous rows. Ch 1, turn. (first decrease)
Work even in pattern 5 rows. Decrease by skipping first stitch on following row. (second decrease)
Work even in pattern 5 rows. Decrease by skipping first stitch on following row. (third decrease)
Work even in pattern 5 rows. Decrease by skipping first stitch on following row. (fourth decrease)
Work even in pattern 5 rows. Decrease by skipping first stitch on following row. (fifth decrease)
Work even in pattern 5 rows. Decrease by skipping first stitch on following row. (sixth decrease); Fasten off.
Front Left Neck (6.0 mm hook)
Join at the second stitch marker. SC across to end. Ch 1, turn.
SC, RDC across to last two stitches. Complete the last RDC . Ch 1, turn. (first decrease)
Work even in pattern 5 rows. Complete SC, RDC row. Do not complete final stitch. (second decrease)
Work even in pattern 5 rows. Complete SC, RDC row. Do not complete final stitch. (third decrease)
Work even in pattern 5 rows. Complete SC, RDC row. Do not complete final stitch. (fourth decrease)
Work even in pattern 5 rows. Complete SC, RDC row. Do not complete final stitch. (fifth decrease)
Work even in pattern 5 rows. Complete SC, RDC row. Do not complete final stitch. (sixth decrease); Fasten off.
Zipper Placket (3.0 mm hook)
Ch 20.
SC 19 across. Ch 1. Turn.
SC across. Ch 1. Turn.
SC, RDC across. Ch 1. Turn.
Work two stitches in the first stitch. SC across in next 8 stitches. Ch 1. Turn. (first increase)
SC, RDC across. Ch 1. Turn.
SC across first 10 stitches. Ch 1. turn.
SC, RDC across. Ch 1. Turn.
SC across.
SC, RDC across.
SC across. Work two stitches in the final stitch. (second increase)
SC, RDC across. Ch 1. Turn.
SC across. Ch 1. Turn.
SC, RDC across. Ch 1. turn.
SC across. Ch 1. Turn.
SC, RDC across. Ch 1. Turn.
Work two stitches in the first stitch. SC across. Ch 1. Turn. (third increase)
SC, RDC across. Ch 1. Turn.
SC across. Ch 1. turn.
SC, RDC across. Ch 1. Turn.
SC across. Ch 1. Turn.
SC, RDC across. Ch 1. Turn.
Work two stitches in the first stitch. SC across. Ch 1. Turn. (fourth increase)
SC, RDC across. Ch 1. Turn.
SC across. Ch 1. turn.
SC, RDC across. Ch 1. Turn.
SC across. Ch 1. Turn.
SC, RDC across. Ch 1. Turn.
Work two stitches in the first stitch, SC across. Ch 1. Turn. (fifth increase)
SC, RDC across.
SC across. Ch 1. Turn.
SC, RDC across. Ch 1. Turn.
SC across. Ch 1. turn.
SC, RDC across. Ch 1. Turn.
SC across. Ch 1. Turn.
SC, RDC across. Ch 1. Turn.
Work two stitches in the first stitch. SC across. Ch 1. Turn. (sixth increase)
SC, RDC across. Ch 1. Turn.
SC across. Ch 1. Turn.
SC across. Ch 1. Turn.
SC across. Turn. Fasten off.
Second Part of Zipper Placket (3.0 mm hook)
With wrong side facing, skip stitch next to completed side. SC in following stitch and other stitches across. SC two stitches in final stitch. (first increase) Ch 1. Turn.
Follow instructions for the first side of the placket, making sure all increases are completed on the outer edge.
Seaming
Seam sweater sides from the bottom of the waistband to the marked row on the back. Seam shoulders. Seam the zipper placket into place on the front of the sweater.
Collar (3.0 mm hook)
With right side facing, join to right edge of zipper placket and work a row of SC all the way across, decreasing on either side of seam joins on the placket and at the shoulders. Should have 87 SC when completed.
SC around. Ch 1. Turn.
SC, RTC, placing RTC’s into previous RDCs where possible. Work around SC two rows down to create RTCs when there are not RDCs to work around. Try to create RTCs directly into seams if possible. Ch 1. Turn.
Ch 1. turn. SC across.
Ch 1. Turn. SC, RDC across.
Repeat pattern rows until 40 rows complete, ending on a row with RDCs. Fasten off.
Inner Collar (3.0 mm hook)
Ch 88.
Skipping first chain, SC across. Ch 1. Turn.
SC across. Ch 1. Turn.
SC, RDC.
Work in pattern until 40 rows complete. Fasten off.
Sleeves (6.0 mm hook)
Note: Sleeves are based on measurements given at the top of the pattern; if you need to adjust measurements for a better fit, use the provided gauge to figure out the proper sizing and decrease as instructed for as many or few decreases as you need.
Join at the bottom edge of the sleeve opening on the front of the sweater. SC 67 around from front to back. Do not join. Ch 1. Turn.
SC around. Ch 1. Turn.
DEC 1 stitch each end, SC, RTC (65). Ch 1. Turn.
SC around. Ch 1. Turn.
SC around. Ch 1. Turn.
SC RDC around. Ch 1. Turn.
DEC 1 stitch each end, SC around (63). Ch 1. Turn.
SC, RDC around. Ch 1. Turn.
SC around. Ch 1. Turn.
SC, RDC around. Ch 1. Turn.
Dec 1 stitch each end, SC around (61). Ch 1. Turn.
SC, RDC around. Ch 1. Turn.
SC, RDC around. Ch 1. Turn.
SC around. Ch 1. Turn.
SC RDC around. Ch 1. Turn.
Dec 1 stitch each side, SC around (59). Ch 1. Turn.
SC, RDC around. Ch 1. Turn.
SC around. Ch 1. Turn.
SC, RDC around. Ch 1, Turn.
Dec 1 stitch each side, SC around (57). Ch 1. Turn.
SC, RDC around. Ch 1. Turn.
SC around. Ch 1. Turn.
SC, RDC around. Ch 1, Turn.
Dec 1 stitch each side, SC around (55). Ch 1. Turn.
SC, RDC around. Ch 1. Turn.
SC around. Ch 1. Turn.
SC, RDC around. Ch 1, Turn.
Dec 1 stitch each side, SC around (53). Ch 1. Turn.
SC, RDC around. Ch 1. Turn.
SC around. Ch 1. Turn.
SC, RDC around. Ch 1, Turn.
Dec 1 stitch each side, SC around (51). Ch 1. Turn.
SC, RDC around. Ch 1. Turn.
SC around. Ch 1. Turn.
SC, RDC around. Ch 1, Turn.
Dec 1 stitch each side, SC around (49). Ch 1. Turn.
SC, RDC around. Ch 1. Turn.
SC around. Ch 1. Turn.
SC, RDC around. Ch 1, Turn.
Dec 1 stitch each side, SC around (47). Ch 1. Turn.
SC, RDC around. Ch 1. Turn.
SC around. Ch 1. Turn.
SC, RDC around. Ch 1, Turn.
Dec 1 stitch each side, SC around (45). Ch 1. Turn.
SC, RDC around. Ch 1. Turn.
SC around. Ch 1. Turn.
SC, RDC around. Ch 1, Turn.
Dec 1 stitch each side, SC around (43). Ch 1. Turn.
SC, RDC around. Ch 1. Turn.
SC around. Ch 1. Turn.
SC, RDC around. Ch 1, Turn.
Dec 1 stitch each side, SC around (41). Ch 1. Turn.
Keep repeating the last 4 rows until the sleeve reaches the base of your wrist (if you do not need any more decreases, work even). Do not fasten off.
Wristband (3.0 mm hook)
Work 1 row of BLO SC. Ch 1. Turn.
Work 1 row of SC. Ch 1. Turn.
Work a row of SC, RDC across. Ch 1. Turn.
Continue working in pattern until the wristband is 3 inches long. End on a row with RDCs. Fasten off.
Repeat sleeve and wristband on other side of sweater. When completed, sew sleeve seams.
Optional Faux Cuffs (3.0 mm hook)
Ch 10.
Skipping first chain, SC 9 across. Ch 1. Turn.
SC 9 across. Ch 1. Turn.
SC, RDC across. Ch 1. Turn.
SC across. Ch 1. Turn.
Continue in pattern rows until the cuff measures 6 inches. Fasten off.
Repeat steps for second cuff.
Sew cuffs into place on the sleeve seam, with loose edge pointed outward.
Finishing
Thread floral wire or other attaching item through zipper pull. String the gold accent and five smaller pearls. Fasten off to secure the pearls and accent.
Sew zipper to the zipper placket and collar.
Sew inner collar to outer collar and zipper.
Space large pearls evenly on the faux cuffs and sew through both the cuff and the wristband or sleeve to secure.
Attach brooch on the chest similar to photos (or wherever you want; it’s your sweater).
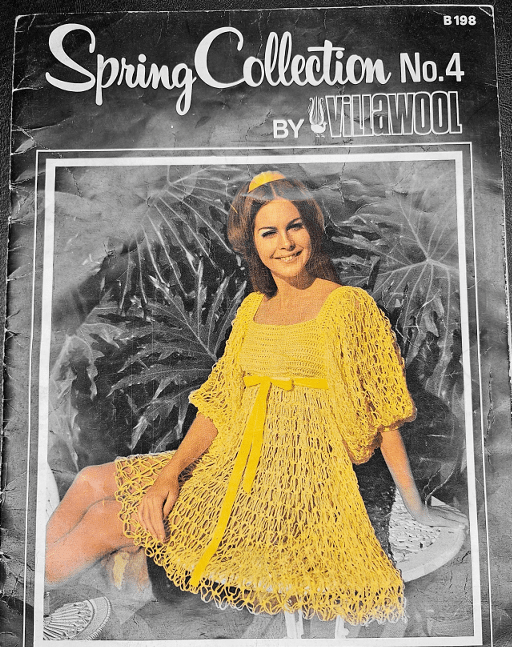
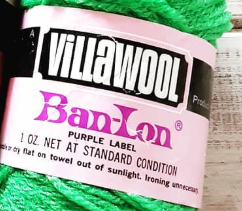
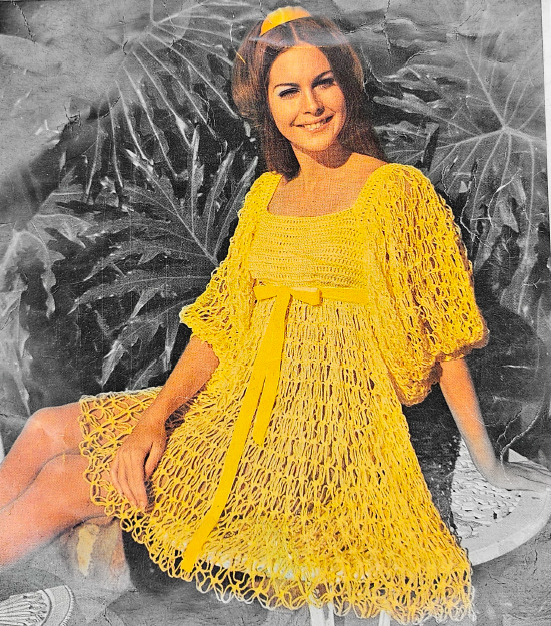
Villawool was an Australian yarn company that put out a yarn called Ban-Lon in the 1970s. Ban-Long was a 100% nylon yarn in 1 ounce balls in DK weight (8 ply). This booklet notes you want the “purple label” Ban-Lon, and my best guess about why the purple label was important is that it may have signified which Villawool yarns were nylon. Nylon yarns were a pretty new thing at the time, so I can see a company wanting to make them stand out.
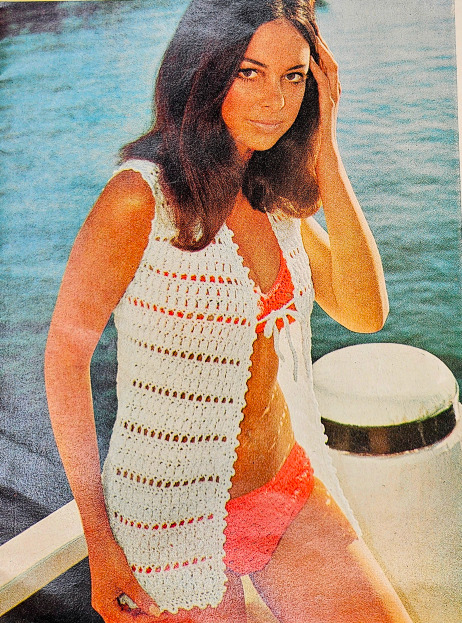
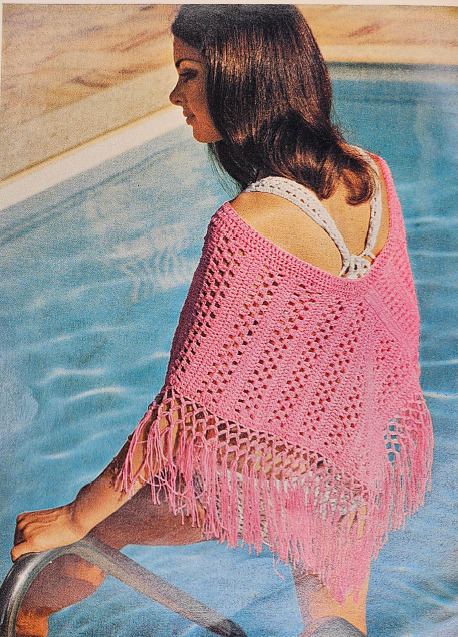
Anyway, this booklet includes 9 crochet patterns and 3 knitting patterns. Two of the crochet patterns are bikinis, and the photographer absolutely failed to get any full shots of them. The first one you can mostly see. The second one you can only see the straps under the poncho.
Identified Spinnerin Sparkle Twist as a sportweight.
Corrected a mistake: J&P Knit Cro-Sheen is size #10, not size #5 thread. Not sure where I got the #5 information. Reviewing my usual places, it wasn’t listed that way.
I’m hoping to find some time to do a full review of the entire list sometime in 2025 just to see if there’s further information I could fill in on some of the blank spots.
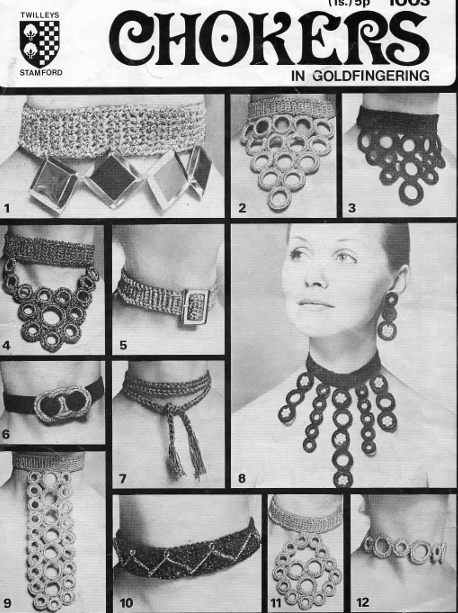
Courtesy of Twilley’s, a British yarn company, all of these chokers are built in similar fashion with the fun being in the different details. Some chokers call for curtain rings, which you can find at a sewing store on or Amazon. British crochet terms used, fingering weight yarn required.